Part 1 Understanding and creating a new plugin framework
QGIS 3.0 can be extended with a wide range of functionality using plugins. While there are thousands of plugins available in the Plugin manager, it is often necessary or advantageous to create your own plugins to automate common tasks or add extra functionality to a workflow.
Since QGIS uses Python as the back-end scripting language it is possible to tie together a whole host of other packages to take advantage of tools that would otherwise be unavailable in QGIS. These features could include Matplotlib to generate graphs, charts and other plots to inset into maps or something as complex as Agisoft Metascan’s stand-alone Python module to add full Structure from Motion photogrammetry support within QGIS itself.
Understanding the Plugin system for QGIS 3
Plugins in QGIS 3 have no direct analog in the Esri ArcGIS world which can be confusing for users migrating from that work environment. It can best be described as a half-way point between Python toolboxes and ArcObjects.
Like a Python toolbox in ArcGIS, the Python language is used to underpin the logic side of the plugin. PyQGIS is the QGIS equivalent of ArcPy. Its documentation is strong and it can be used to access all of the built in features of QGIS, this documentation can be found at https://qgis.org/pyqgis/3.4/.
However, unlike in ArcGIS a QGIS python plugin requires the developer to build the user interface in Qt. Where the Python toolbox takes parameters and builds a UI with the appropriate drop boxes, radio buttons etc., PyQGIS offers a slightly more complex development process. Because the UI is handled using Qt the plugin requires a more complicated set of files and bindings to work. Simply making up a python file is not enough, the plugin needs to be compiled and configured before it can be run or shared.
PyQGIS introduction
Before we get into building the plugin, it is important to understand the underlying Python framework used by QGIS. PyQGIS is organized into 4 major modules:
- qgis.core
- qgis.gui
- qgis.analysis
- qgis.server
qgis.core
This module deals with the core mapping and data handling functionality of QGIS. This includes creating and accessing layers, generating layouts, adding labels, symbology, table operations (joins, field creation etc.).
Think of this module as the programmatic representation of the data browser and layer window.
qgis.gui
This module applies to both plugins as we are discussing in this document as well as stand-alone applications that use the QGIS libraries. We will get into those later. The GUI module includes graphical widgets that can be used to build toolboxes, map canvas areas and other graphical elements for a plugin or stand-alone applications. For example, the qgis.gui.QgsMapCanvas() class creates a map canvas widget which can be used to display geospatial data in either a plugin or stand-alone application without having to create a new canvas widget yourself.
qgis.analysis
The analysis module includes all the tools needed for data and spatial analysis. These include tools for checking topology, creating graphs, editing geotagged photo EXIF tags etc. These tools are typically used in higher level geospatial work where creation and editing of features has already been done and spatial intelligence needs to be generated. Raster interpolations are also covered in this module.
qgis.server
As would be expected by the name, the server module is intended to be used on a QGIS server. It is used to handle publishing services and layers as well as handling traffic and geoprocessing requests made to the server.
Creating a QGIS plugin
Understanding the plugin framework
Since the file structure of PyQGIS requires a number of dependencies and bindings, creating a plugin requires more than just setting up a single file. The basic structure of a QGIS plugin is as follows:
__init__.py
- This file is called when QGIS loads the plugin, since QGIS doesn’t know the filename of the plugin you created this file makes the initial connection to your plugin python module and the main class within it where the logic is run.
[plugin_name].py
- This is the file that contains all the plugin logic. This includes geoprocessing scripts and bindings to the UI created in Qt.
[plugin_name]_dialog.py
- This file creates the UI window by calling the Qt ui file and binding the PyQGIS widgets to it.
[plugin_name]_dialog_base.ui
- This is the Qt UI file. It contains all the user interface code created by Qt Creator.
plugin_upload.py
- As the name suggests, this file provides the framework for uploading the plugin to the QGIS plugin browser.
resources.py / resources.qrc
- These files are related. The qrc file is the xml for Qt that defines external resources such as icons. The py file is the same file compiled for Python to read natively. Neither is mandatory but not having them will raise errors.
metadata.txt
- The metadata file contains formatted text that includes all the information displayed in the QGIS plugin browser
icon.png
- The icon your plugin will use in the toolbar.
This basic framework is what we call the boilerplate, or a reusable baseline common to all plugins. For that reason rather than creating them all manually for every plugin we can use another plugin to generate them all automatically, saving time and reducing errors.
Useful plugins for creating new plugins
There are two very useful plugins for developing new plugins for QGIS. The first is “Plugin Builder” and the second is “Plugin Reloader”
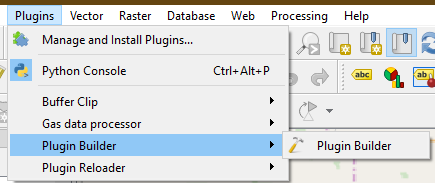
Plugin Builder generates all of the necessary boilerplate files for a new plugin by taking the user through a set of dialog boxes.
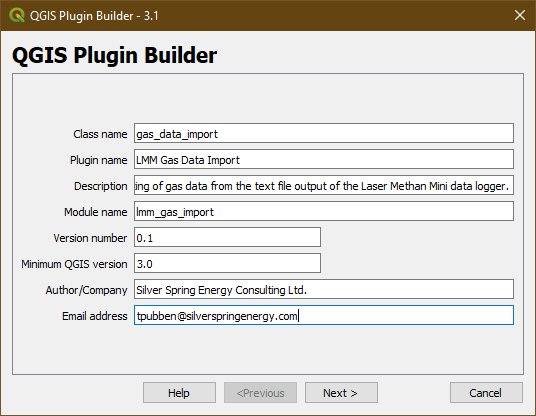
Class name: The name of the class within the module you are about to create that contains your code.
Plugin name: This is the plain text name for the plugin you are constructing
Description: Pretty self describing.
Module name: This is the name of the python file you will be creating
Version number: arbitrary, start versioning from 0.x until your code is production ready.
Minimum QGIS version: specifies what the lowest version of QGIS is that is required to run the plugin.
Author/Company: your name or company name
Email address: address where you want questions relating to your plugin directed.
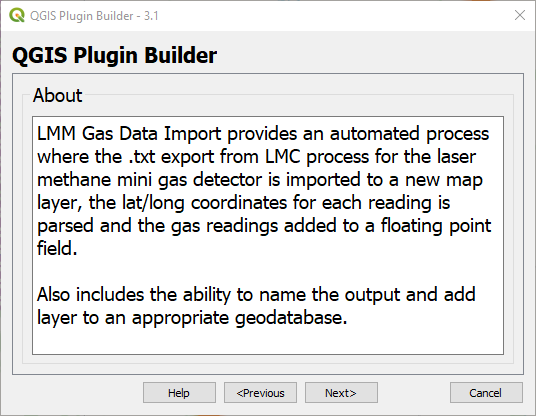
Add a useful description.
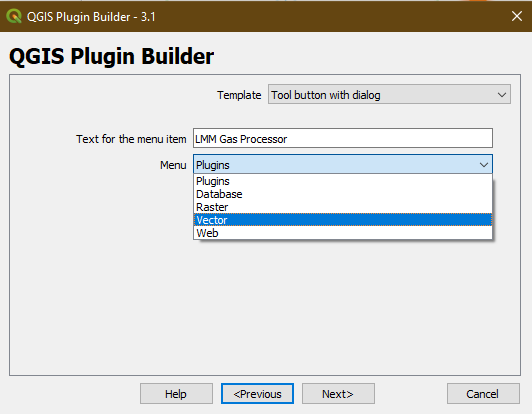
Create the text you wish to have show up for the menu item and select which menu you wish the plugin to show up in when installed. Default is plugins, but other menus may be more suitable.

These are optional files to be created with the plugin. You can skip all of them but it is recommended you keep the pb_tool file and the help file as they are very useful. Pb_tool allows easy python compilation later on.
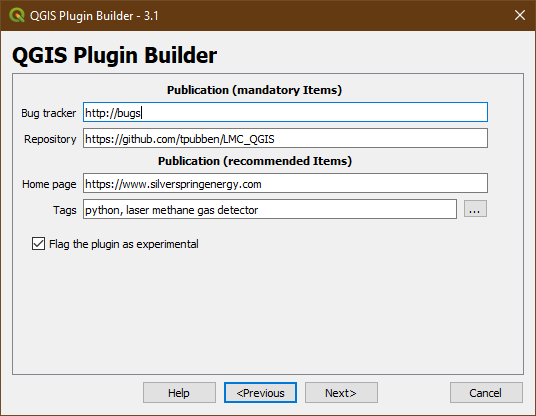
It is recommended you add a URL to your github repository for this plugin as well as contact info.
*** Make sure to flag your plugin as experimental until it no longer is ***
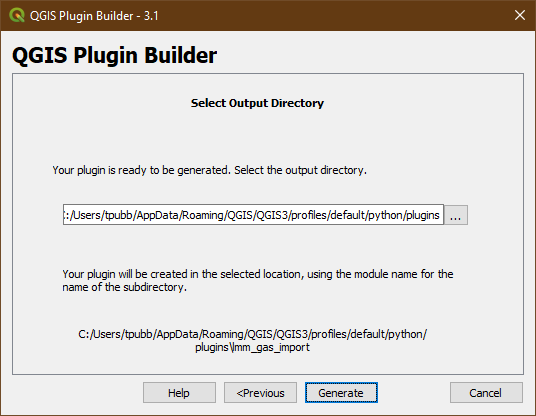
Selecting an appropriate directory to create the framework is important but not essential. In Windows, QGIS looks for plugins in the following folder:
C:/Users/[username]/AppData/Roaming/QGIS/QGIS3/profiles/default/python/plugins
It can be useful to create the folder here to prevent moving it at a later time.
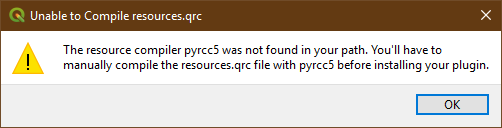
You may get an error indicating that pyrcc5 could not be found and that you must manually compile the resources.qrc file. We will go over that next.
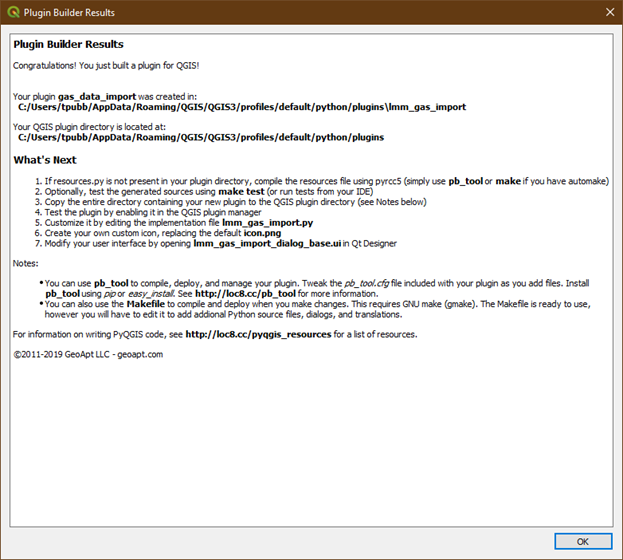
Once your plugin has been created a results window will open and show where the plugin was created and the relevant information on what to do next.
Compiling resources.qrc in Windows
If you received the pyrrc5 error when generating your plugin in Windows, it is a simple fix by creating a Windows batch file.
Navigate to the folder where you created your plugin in Windows explorer. Once there create a new text file named “compile.txt” and change the file extension to “.bat”
Find your QGIS installation folder:
Depending on where you installed your QGIS application it could be in a number of different locations. If you used the Version 3.4 Standalone installer it will likely be in:
C:\Program Files\QGIS 3.4\
If you used the OSGEO4W installer it may be in:
C:\OSGEO_4W\
Editing the compile.bat file to compile resources.qrc
Right click the compile.bat file and select “Edit”. This will open notepad. Paste the following into the file, changing everything inside the square brackets [] with the path to your QGIS installation.
@echo off
call “[path_to_qgis]\bin\o4w_env.bat”
call “[path_to_qgis]\bin\qt5_env.bat”
call “[path_to_qgis]\bin\py3_env.bat”
@echo on
pyrcc5 -o resources.py resources.qrc
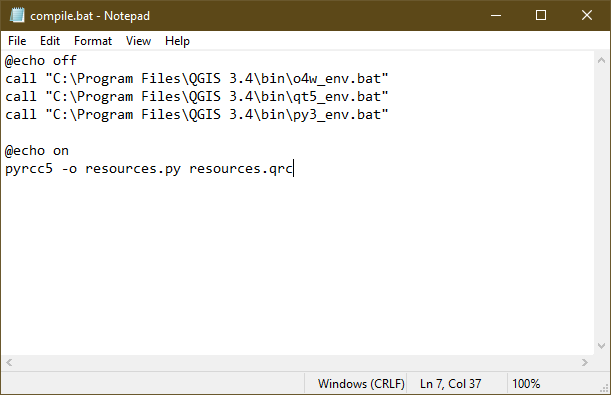
The square brackets are placeholders and do not need to remain. If your default path is the same as this tutorial’s the file would look like:
@echo off
call “C:\Program Files\QGIS 3.4\bin\o4w_env.bat”
call “C:\Program Files\QGIS 3.4\bin\qt5_env.bat”
call “C:\Program Files\QGIS 3.4\bin\py3_env.bat”
@echo on
pyrcc5 -o resources.py resources.qrc
Save and exit.
To run the compiler, simply double click the batch file you just created and everything should run. A new resources.py file should show up in the folder.
Done!